ZITADEL with Python
This example shows you how to secure a Python3 Flask API with both authentication and authorization using ZITADEL.
Overview

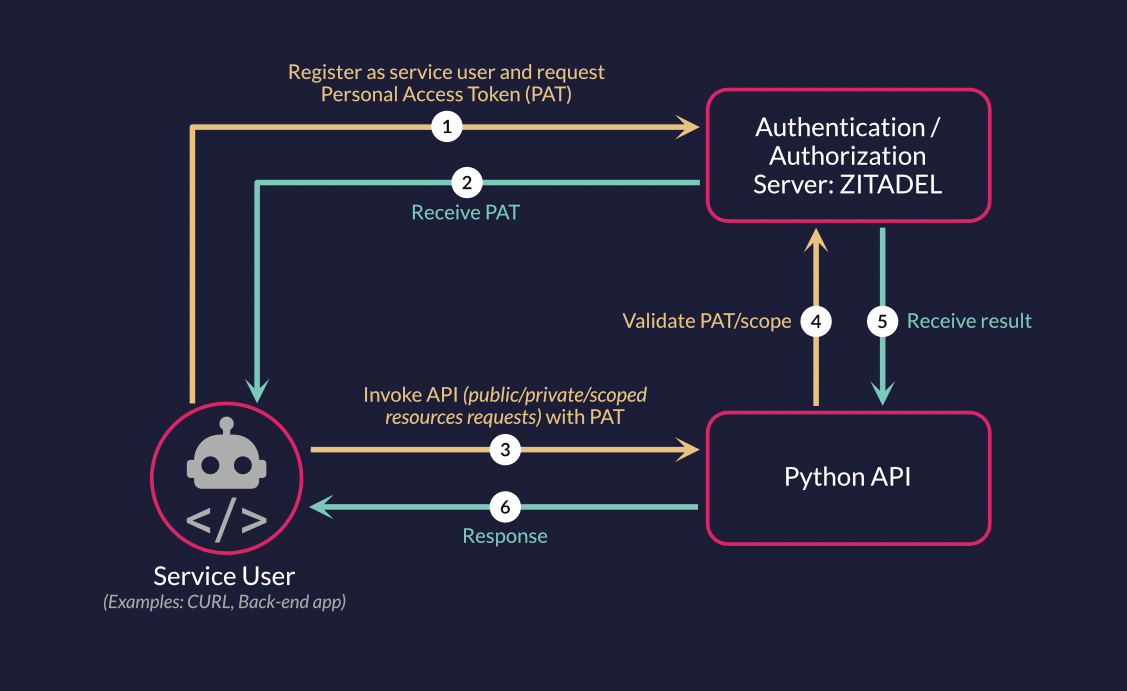
The Python API will have public, private, and private-scoped routes and check if a user is authenticated and authorized to access the routes. The private routes expect an authorization header with a valid access token in the request. The access token is used as a bearer token to authenticate the user when calling the API. The API will validate the access token on the introspect endpoint and will receive the user's roles from ZITADEL.
The API application uses Client Secret Basic to authenticate against ZITADEL and access the introspection endpoint. You can use any valid access_token from a user or service account to send requests to the example API. In this example we will use a service account with a personal access token which can be used directly to access the example API.
Running the example
Python Prerequisites
In order to run the example you need to have python3 and pip3 installed.
ZITADEL configuration for the API

You need to setup a couple of things in ZITADEL.
-
If you don't have an instance yet, please go ahead and create an instance as explained here. Also, create a new project by following the steps here.
-
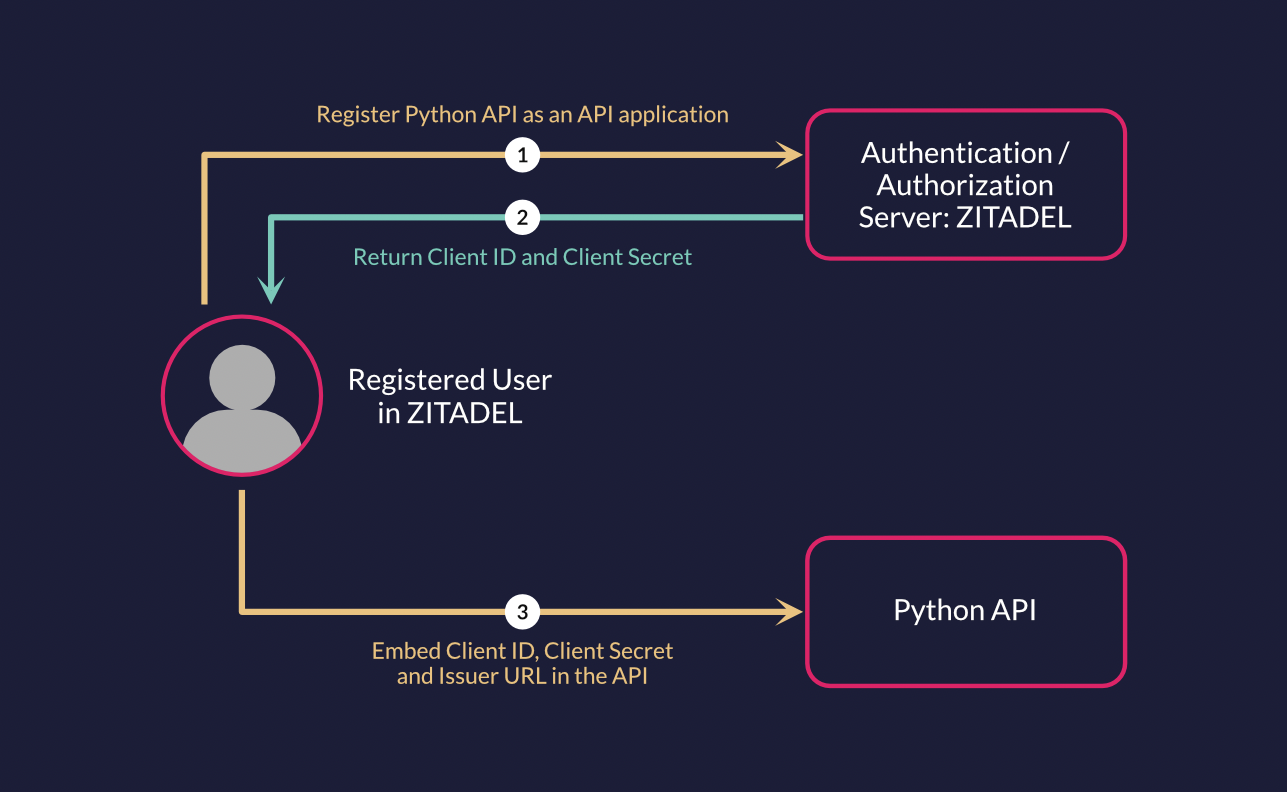
You must create an API application in your project. Follow this guide to create a new application of type "API" with authentication method "Basic". Save both the ClientID and ClientSecret after you create the application.
Create the API
- Clone or download this Python project to your workspace.
git clone https://github.com/zitadel/example-api-python3-flask

cd example-api-python3-flask
- The server.py file contains a Flask-based API that provides authentication for routes using the OpenID Connect protocol as shown below.
from flask import Flask, jsonify, Response
from authlib.integrations.flask_oauth2 import ResourceProtector
from validator import ZitadelIntrospectTokenValidator, ValidatorError

require_auth = ResourceProtector()
require_auth.register_token_validator(ZitadelIntrospectTokenValidator())

APP = Flask(__name__)

@APP.errorhandler(ValidatorError)
def handle_auth_error(ex: ValidatorError) -> Response:

    response = jsonify(ex.error)
    response.status_code = ex.status_code
    return response

@APP.route("/api/public")
def public():
    """No access token required."""
    response = (
        "Public route - You don't need to be authenticated to see this."
    )
    return jsonify(message=response)


@APP.route("/api/private")
@require_auth(None)
def private():
    """A valid access token is required."""
    response = (
        "Private route - You need to be authenticated to see this."
    )
    return jsonify(message=response)


@APP.route("/api/private-scoped")
@require_auth(["read:messages"])
def private_scoped():
    """A valid access token and scope are required."""
    response = (
        "Private, scoped route - You need to be authenticated and have the role read:messages to see this."
    )
    return jsonify(message=response)

if __name__ == "__main__":
    APP.run()
The API has three routes:
- "/api/public" - No access token is required.
- "/api/private" - A valid access token is required.
- "/api/private-scoped" - A valid access token and a "read:messages" scope are required.
The validator.py file implements the ZitadelIntrospectTokenValidator class, which is a custom class that inherits from the IntrospectTokenValidator class provided by the authlib library. The introspection process retrieves the token details from ZITADEL using ZITADEL's introspection endpoint.
from os import environ as env
import os
import time
from typing import Dict

from authlib.oauth2.rfc7662 import IntrospectTokenValidator
import requests
from dotenv import load_dotenv, find_dotenv
from requests.auth import HTTPBasicAuth

load_dotenv()

ZITADEL_DOMAIN = os.getenv("ZITADEL_DOMAIN")
CLIENT_ID = os.getenv("CLIENT_ID")
CLIENT_SECRET = os.getenv("CLIENT_SECRET")


class ValidatorError(Exception):

    def __init__(self, error: Dict[str, str], status_code: int):
        super().__init__()
        self.error = error
        self.status_code = status_code

# Use Introspection in Resource Server
# https://docs.authlib.org/en/latest/specs/rfc7662.html#require-oauth-introspection

class ZitadelIntrospectTokenValidator(IntrospectTokenValidator):
    def introspect_token(self, token_string):
        url = f'{ZITADEL_DOMAIN}/oauth/v2/introspect'
        data = {'token': token_string, 'token_type_hint': 'access_token', 'scope': 'openid'}
        auth = HTTPBasicAuth(CLIENT_ID, CLIENT_SECRET)
        resp = requests.post(url, data=data, auth=auth)
        resp.raise_for_status()
        return resp.json()

    def match_token_scopes(self, token, or_scopes):
        if or_scopes is None:
            return True
        roles = token["urn:zitadel:iam:org:project:roles"].keys()
        for and_scopes in or_scopes:
            scopes = and_scopes.split()
            """print(f"Check if all {scopes} are in {roles}")"""
            if all(key in roles for key in scopes):
                return True
        return False

    def validate_token(self, token, scopes, request):
        print (f"Token: {token}\n")
        now = int( time.time() )
        if not token:
            raise ValidatorError({
                "code": "invalid_token_revoked",
                "description": "Token was revoked." }, 401)
        """Expired"""
        if token["exp"] < now:
            raise ValidatorError({
                "code": "invalid_token_expired",
                "description": "Token has expired." }, 401)
        """Revoked"""
        if not token["active"]:
            raise InvalidTokenError()
        """Insufficient Scope"""
        if not self.match_token_scopes(token, scopes):
            raise ValidatorError({
                "code": "insufficient_scope",
                "description": f"Token has insufficient scope. Route requires: {scopes}" }, 401)

    def __call__(self, *args, **kwargs):
        res = self.introspect_token(*args, **kwargs)
        return res
- Create a new file named ".env" in the directory. Copy the configuration in the ".env.example" file to the newly created .env file. Set the values with your Instance Domain/Issuer URL, Client ID, and Client Secret from the previous steps. Obtain your Issuer URL by following these steps.
ZITADEL_DOMAIN = "https://your-domain-abcdef.zitadel.cloud"
CLIENT_ID = "197....@projectname"
CLIENT_SECRET = "NVAp70IqiGmJldbS...."
ZITADEL configuration to create a service user

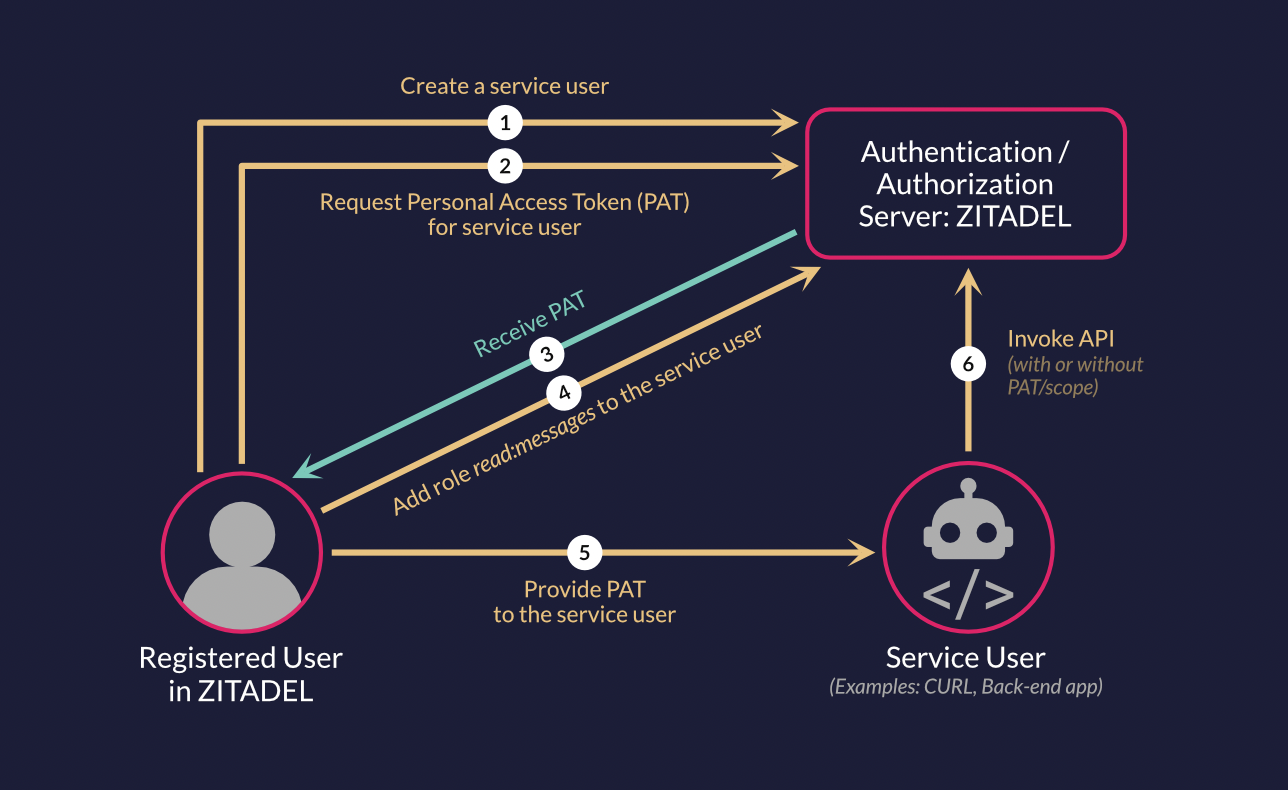
- Create a service user and a Personal Access Token (PAT) for that user by following this guide.
- To enable authorization, follow this guide to create a role
read:messageson your project. - Next, create an authorization for the service user you created by adding the role
read:messagesto the user. Follow this guide for more information on creating an authorization.
Run the API
- Install required dependencies by running
pip3 install -r requirements.txton your terminal. - Run the API with the
python3 server.pycommand. - Open another terminal and follow the next step to test the API.
Test the API
Public route
Invoke the public route by running the following command:
curl --request GET \
    --url http://127.0.0.1:5000/api/public
You should get a response with Status Code 200 and the following message.
{"message":"Public route - You don't need to be authenticated to see this."}
Private route
Call the private route without authorization headers by running the following command:
curl --request GET \
    --url http://127.0.0.1:5000/api/private
You should get a response with Status Code 401 and an error message.
Now let's add an authorization header to your request. Save the personal access token for your service user to a variable by running the following command. Replace the value with the PAT you obtained earlier.
PAT=nr9vnUTkQkn4rxWk...
Then call the private route with the PAT in the authorization header.
curl --request GET \
    --url http://127.0.0.1:5000/api/private \
    --header "authorization: Bearer $PAT"
Now you should get a response with Status Code 200 and the following message.
{"message":"Private route - You need to be authenticated to see this."}
Private route, protected
Call the private route that requires the user to have a certain role
curl --request GET \
    --url http://127.0.0.1:5000/api/private-scoped \
    --header "authorization: Bearer $PAT"
You should get a response with Status Code 200 and the following message.
{"message":"Private, scoped route - You need to be authenticated and have the role read:messages to see this."}
You can remove the role from the service user in ZITADEL and try again. You should then get a Status Code 403, Forbidden error.